CM5 Carrier Board
Raspberry Pi CM5 Carrier Board for Robotics
The CM5 Carrier Board project is an exciting step toward miniaturizing and standardizing the components of my bipedal companion robot. By transitioning from a Raspberry Pi 5 to the Raspberry Pi Compute Module 5 (CM5), I aim to create a more compact, efficient, and customizable design for robotics and other embedded systems.
The Motivation Behind the Project
The current robot design uses a Raspberry Pi 5 with a custom PCB attached to its GPIO headers. While functional, this setup is bulky due to the use of off-the-shelf modules for components like the microphone amplifier, NeoPixels, and more. These modules take up significant space, limiting design flexibility.
The CM5 offers a solution by removing unnecessary connectors (e.g., USB, Ethernet) and providing a smaller form factor. This allows for the creation of custom carrier boards tailored to specific needs, making it ideal for robotics projects where space and modularity are critical.
Transitioning to the Compute Module 5
The CM5 is a compact version of the Raspberry Pi, designed for embedded applications. It connects to carrier boards via two small connectors, enabling developers to design custom PCBs that expose only the required interfaces. Key advantages include:
- Smaller Form Factor: Perfect for fitting into tight spaces like the robot’s head.
- Onboard Storage: Eliminates the need for an SD card, with storage options based on project requirements.
- Customizable Interfaces: Allows for the removal of unused ports and the addition of project-specific features.
To begin the transition, I acquired the CM5, its IO board, a passive cooling heatsink, and other prototyping tools. This setup enabled me to test components and plan the design of the custom carrier board.
Challenges and Improvements
Reducing Bulk
The current design relies on pre-assembled modules, which are bulky and difficult to integrate cleanly. By replacing these with discrete components on a custom PCB, I can significantly reduce the size and improve the aesthetics of the robot.
Modular Design
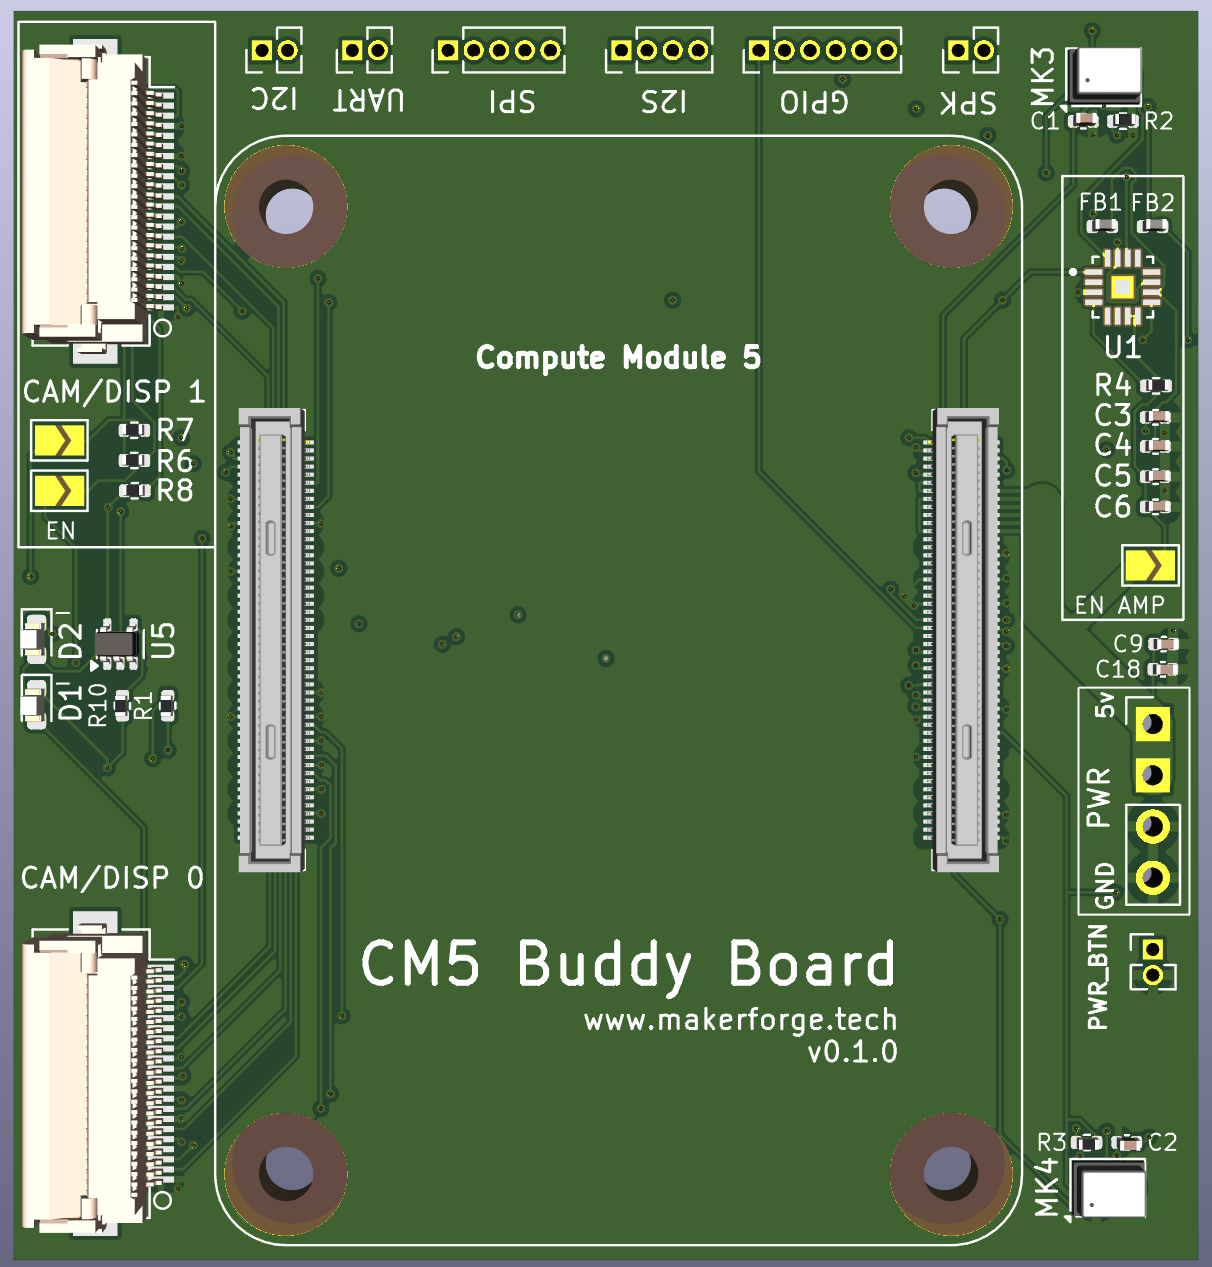
The new carrier board will be split into two parts:
- Generic Board: Includes features like a microphone, amplifier, camera integration, and common protocols (SPI, I2C, I2S).
- Project-Specific Board: Adds features unique to the robot, such as servo control and motion detection.
This modular approach ensures flexibility for future projects while maintaining the specific functionality required for the robot.
Improved Interfaces
The CM5 allows for better integration of components like NeoPixels, microphones, and amplifiers. For example:
- NeoPixels: Switching to the SPI interface eliminates the need for additional boards, simplifying the design.
- Microphone and Amplifier: These will be integrated directly into the PCB, reducing reliance on external modules and improving accessibility.
Testing and Prototyping
To validate the design, I connected components like the microphone, amplifier, NeoPixels, and motion sensors to the CM5 IO board via a ribbon cable. This setup allowed me to test functionality and compatibility before finalizing the PCB design.
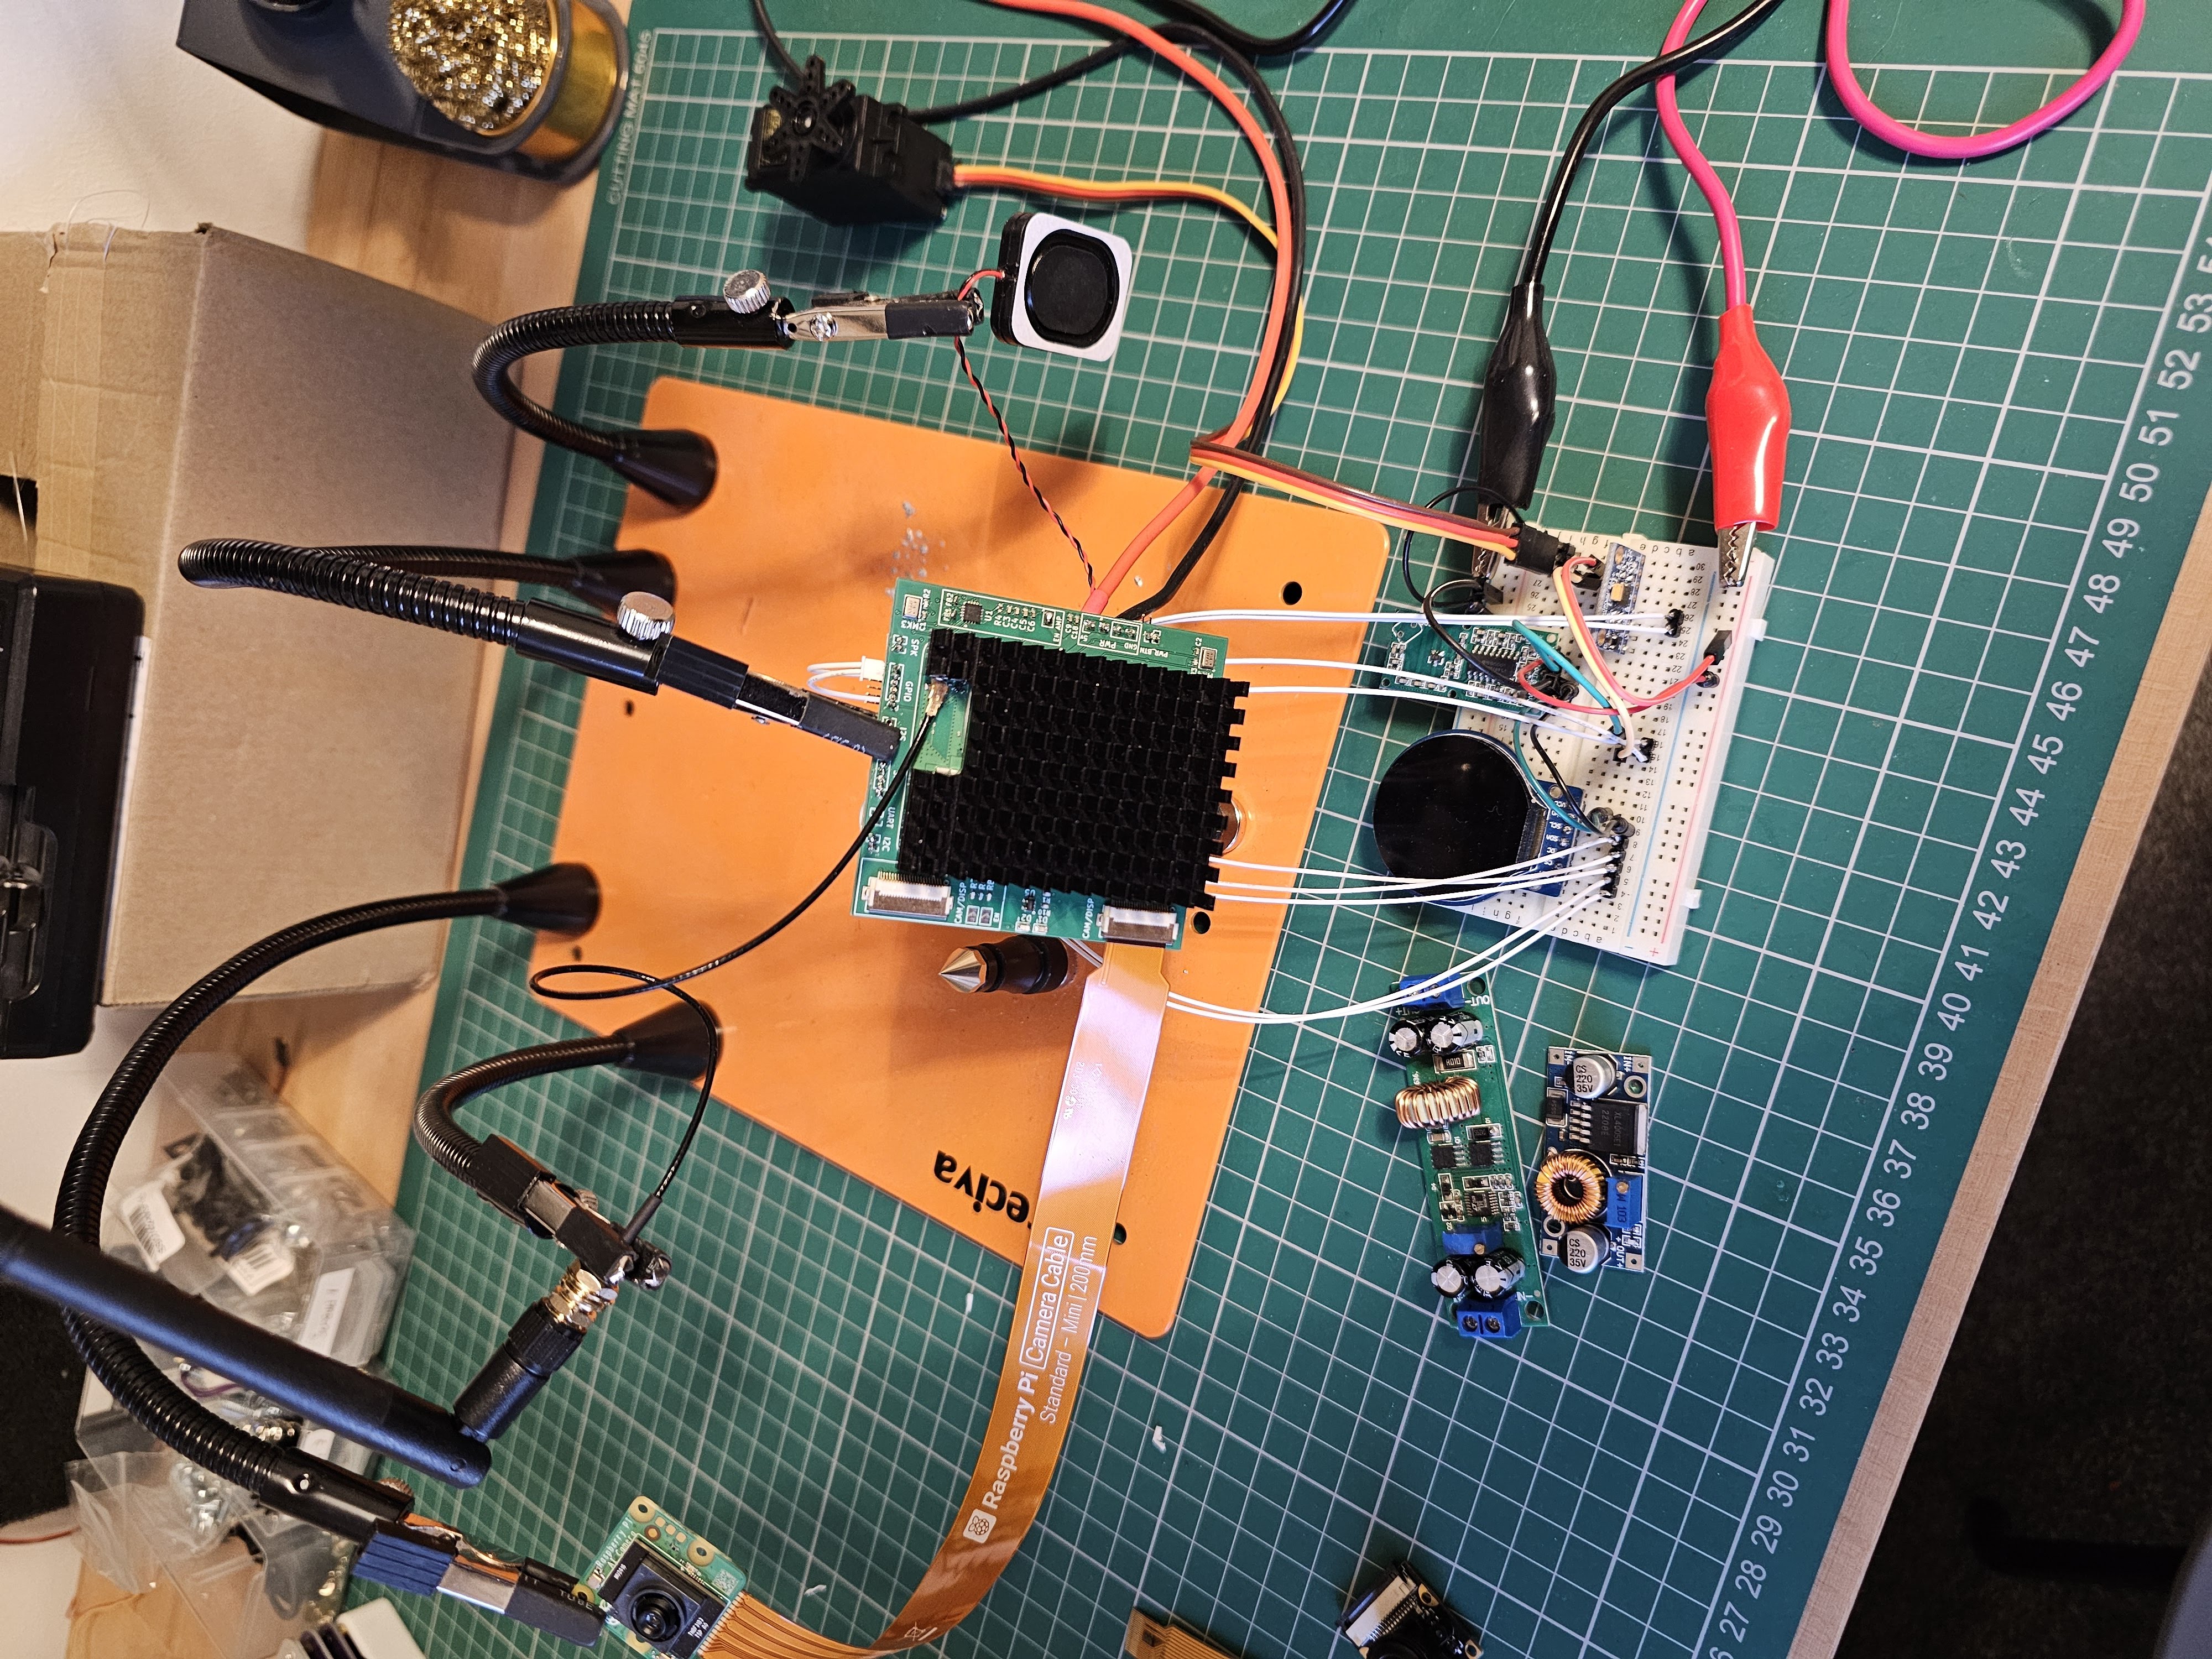
Key components tested include:
- Microphone and Amplifier: Using the I2S interface for cleaner integration.
- NeoPixels: Controlled via SPI for better performance and reduced complexity.
- Servo Driver: Exploring options to replace the Arduino with a direct Raspberry Pi connection.
- Motion Sensor: Detects nearby presence to trigger sleep or wake modes.
Designing the Carrier Board
The next step is to design the custom PCB using KiCad. Raspberry Pi provides the CM5 IO board design files, which serve as a reference for creating the carrier board. The design will focus on:
- Compact Layout: Minimizing size while maintaining functionality.
- Discrete Components: Replacing bulky modules with integrated circuits.
- Flexible Interfaces: Exposing GPIO, SPI, I2C, and other protocols for future use.
Future Plans
This project is an opportunity to learn and experiment with PCB design and assembly. By leveraging services like PCBWay, I can prototype and manufacture the carrier board efficiently. The ultimate goal is to create a compact, modular platform that not only enhances the robot but also serves as a foundation for other embedded projects.
Stay tuned for updates as I finalize the design, manufacture the PCB, and integrate it into the robot. Follow along to see how the CM5 Carrier Board transforms this project into a more streamlined and versatile system!
Resources and References
- Video: Robotics CM5 Carrier Board - Part One
- Blog Post: MakerForge Blog